

Add custom fields
Give your users extra fields — a note, a date, a number, a list of options, an image or a file — from the users list, without code.
Custom fields let you keep information about a user that the form does not ask for yet: an observation, a contract date, an employee number, a department picked from a list, a photo of a document, a signed contract. You add them from the users list, and from then on they appear in every user's form. This guide covers who can add them, how to add, order, change and delete them, how to fill them in, and where the image and file types keep what you upload.
Who can add them
The Custom fields button appears on the users list, at /admin/users, for anyone whose role can create or edit users. Nobody needs a new permission: if you can edit a user, you can change that list's fields. Every change is checked again when it is saved.
In this project only the users list has custom fields. A developer can switch them on for another list; see For developers below.
Add a field
-
Open
/admin/usersand click Custom fields in the bar above the table. -
Under New custom field, write the Name. It is the label the form shows.
-
Pick the Type:
Type What you capture Text A line of text Number A number Date A date List of options One option picked from a list. Write the options in Options, one per line Image A picture, stored in your media library File Any kind of file — a PDF, a spreadsheet, a document, an audio track — stored in your media library -
Click Add field. It joins the list above the form.
Two fields cannot share a name, and names that differ only in capitals, spaces or punctuation count as the same name: Delivery notes and delivery-notes are refused as repeated.
When you close the window, the page reloads so the list and the forms show the change.
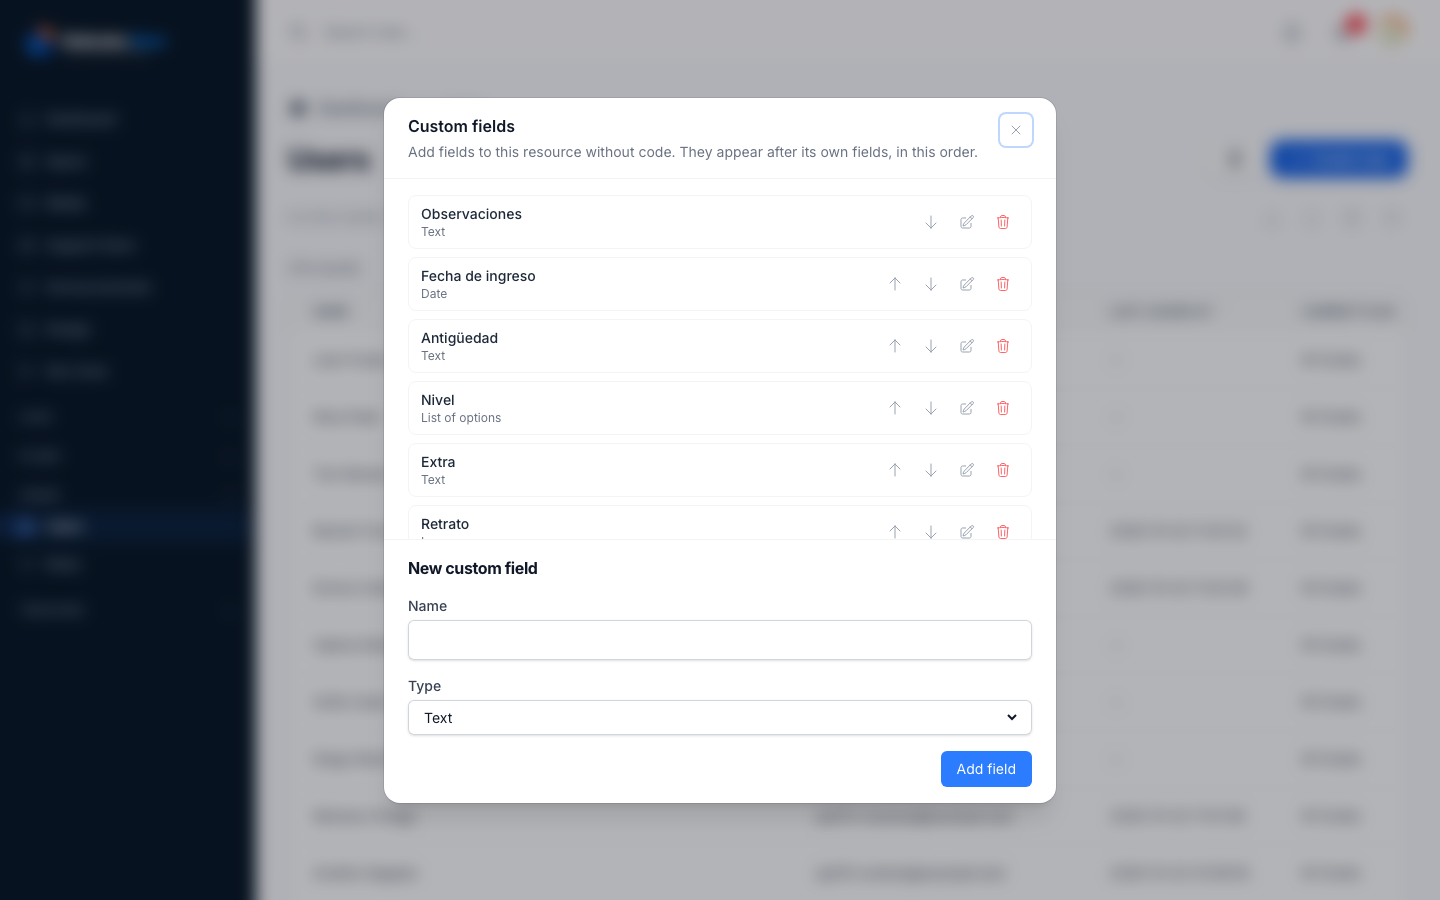
Order, change and delete them
In the window's list:
- The arrows move a field up or down. The form shows the fields in this order.
- The pencil loads a field into the form below; change it and click Save field, or Cancel to leave it as it was.
- The trash can deletes the field.
Deleting a field, or changing its type, takes it out of the form and the columns, but the values users already have are kept. Create a field with the same name again and they come back. Renaming works the same way: the new name starts empty, and the old values stay kept under the old name.
Fill them in
Create or edit a user: the custom fields appear after the user's own fields, in the order you set. None of them is required, so a user can be saved with any of them empty.
An Image field is a drop area that says Drop an image here or click to choose one, with the current picture below it:
- Drop a picture or click the area to choose one. It uploads right away, with a progress bar and a Cancel button, and takes the current picture's place. Saving the form only keeps it; you do not wait for the upload when you save.
- The trash on a picture you just uploaded (Discard) throws it away and brings the current one back.
- On the current picture, Remove from this record takes it off the user when you save and keeps it in the media library; a line under the field says so, with Delete from the media library too and Undo. Delete from the media library deletes it when you save; its line offers Keep in the media library and Undo.
- Replacing a picture you uploaded from the field asks the same: the line under the field says the old one stays in the media library, and Delete from the media library too deletes it when you save. Deleting the user keeps its pictures, so restoring it from the trash brings them back; deleting it for good deletes them, together with its folder in the media library.
- The field under the pictures, Add file ID directly..., uses a file that is already in the media library, by its ID. That file stays in the library when you replace or remove it.
- A file that is not a picture, or that is too big, is refused inside the field, with the reason.
A File field works the same way, with a drop area that says Drop your files here or click to choose them. It takes any kind of file, up to the project's upload limit, which is 110 MB unless your project changed it. In the list the file shows its name and size; in the users list and on the user's page it shows as a document icon with its name, which you click to open the file.
Where images and files are kept
Pictures and files uploaded to an image or file field are stored in the General folder, which belongs to the project rather than to any account. They do not count against your space or anybody else's, so a large file never stops you from saving a user. You find them under Media in the admin menu, in General, inside a folder named after the list and marked as custom fields, such as Users (custom fields), with one subfolder per record. Its path keeps the list's stored name, for example Users/15.
Pictures you look at on the list and in the user's page are served in a smaller size when one is available.
The field remembers which file of the media library it holds, not the file's address, so moving the site to another domain or to https keeps every picture and file in place.
When you delete an image or file field, or change its type or name, the window first asks Delete the stored files?:
- Delete files deletes that field's files from every user, in the background. When you changed the type or the name, the field is also left empty for every user, so a picture field turned into text shows nothing instead of a link to a deleted file.
- Keep files applies the change and leaves the files in the General folder, inside their
Users/{id}folders, where you can delete them by hand. When the field becomes a type that holds no files, such as text, each user keeps the link to their file as the field's value. - Cancel changes nothing.
Show them on the list
Every custom field is offered in the Columns window of the users list, unchecked. Tick it to show it as a column. These columns are read only: the list cannot be sorted or filtered by them. An image field shows a small thumbnail; a file field shows a document icon with the file's name, linked to the file.
Import them from Excel
A column you show is exported with the list, and the same file can be imported back at /admin/users/import: each custom field column fills that field. An empty text, number, date or list cell leaves the field empty, and a file without a field's column leaves that field as it was. An image or file cell holds a link:
- A link to the file the user already has, as an exported file carries it, keeps the file as it is, even if the site's address changed since, so exporting and importing back never duplicates anything.
- Any other link is downloaded and stored in the General folder, replacing the previous file. A link that cannot be downloaded marks that row as an error, and the row saves nothing.
- An empty cell keeps the current file.
For developers
Custom fields come from Laravel Front. A list gets them when its model has a nullable JSON column for the values and its Front resource names it:
public $custom_fields = 'custom_fields';
The users list uses a dedicated custom_fields column. The types offered in the window are listed in config/front.php under custom_field_types; this project points the image type at App\Front\Inputs\MediaImage and adds the file type, App\Front\Inputs\MediaFile, which are what send pictures and files to the media library. The package's own documentation is in the Laravel Front README. For the admin panel as a whole, see /help/the-admin-panel.